CHRISTMAS GIFT WRAPPING IDEAS WITH OLD TIME POTTERY

CHRISTMAS GIFT WRAPPING IDEAS WITH OLD TIME POTTERY

[This post contains sponsored links. The items featured in this post is provided by Old Time Pottery; all opinions and reviews are my own.]

Old Time Pottery is one of my favorite places to shop for Christmas gift wrapping! Come follow along with me, as I share ideas for gift wrapping those holiday gifts!

D443EF66-556A-480C-946A-98B5048C9129

CHRISTMAS WRAPPING WITH OLD TIME POTTERY

I was so excited when Old Time Pottery asked me to team up with them, this holiday season! Christmas is my favorite time of year, as I love everything about the Christmas season! I am sure a lot of you have been thinking about what to buy family or friends for Christmas. What about a homemade treat? Nothing says “I love you” like a homemade treat and it speaks straight to the heart!

After spending an afternoon in your kitchen, be sure to give your sweet gift the presentation it deserves. I have gathered some of my favorite, easy to assemble, food packaging ideas for ya’ll! This was all purchased for under $100!

F3608751-FA46-4A24-92EB-89BAA6D66F70

DECORATIVE BOXES

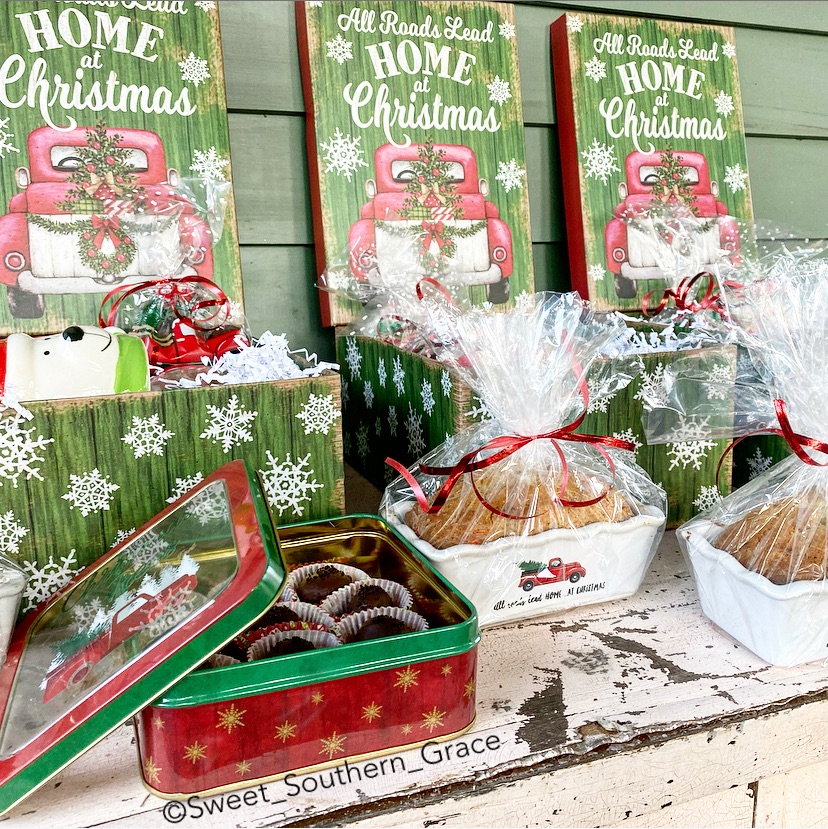
For mine and my husband’s siblings this year, I decided it would be fun to do one family gift for each sibling and their families. I thought it would be fun to do a box of Christmas Eve goodies for them to enjoy together. Old Time Pottery has so many different sized, decorative Christmas boxes that you can use to wrap goodies in! I decided to go with a red truck theme this year and when I saw these boxes, I knew they would be perfect for our sibling‘s family gifts this year!

9EC7EC23-F5BC-4A9B-9C97-6284D020198E                                          

MASON JAR WITH VINTAGE RED TRUCK LID

In the box, I placed homemade hot cocoa mix in a mason jar from Old Time Pottery. The lid even had a vintage red truck on it! Add a cute tag with handwritten or printed directions for the hot cocoa. 

E2747A21-6378-43CA-A592-8D09761F5CBB

OUR FAMILY’S HOT COCOA RECIPE

My husband has been making this hot cocoa recipe since our oldest two daughter’s were babies. We have had many years to perfect this creamy, chocolatey goodness! 

Hot Cocoa Recipe:

3/4 C Sugar 1

1/4 C Cocoa

4 and 1/3 C Milk

1/2 TSP Vanilla (optional)

Directions:

Mix cocoa and sugar into a saucepan. Stir in milk over medium heat until all sugar and cocoa is dissolved and cocoa is heated. Do not allow this to boil, as it will burn to the bottom of the pan. Add vanilla.

4EFBAA69-1814-446C-98D3-6B4CFEA45B14

FOOD GOODIES FOR THE DECORATIVE BOX

I also added homemade hot chocolate bombs, along with homemade oreo truffles and chocolate covered spoons to stir in their hot cocoa.

B2DF6D10-DA1E-42DC-8DA1-8572125780DD

The hot cocoa also needed Christmas themed mugs to drink from when drinking the hot cocoa. I wanted to add a mug for each of our nieces and nephews; depending on age, I added the Santa, snowman or polar bear mugs to the decorative boxes. 

A86913EB-9FCC-45F9-A608-574EF48BC4E4

PACKAGING FOR THE DECORATIVE BOX

To fill the box, I added white crinkle cut shredded paper. It also helps to cushion the mugs and Vintage Red Car topped mason jars. I always make sure to fill the crinkle cut paper well, making sure to fill nicely around all the edges of the box.

FF4EE881-9EEC-470D-A73F-94B84E17A661

VINTAGE RED TRUCK TINS

I also found the cutest tins with vintage red trucks on them! In these tins, I added mini cupcake holders that held the oreo truffles. The Vintage Red Truck Tins with the truffles will be for our parents, along with our aunts and uncles. You could make something simple for these like boxed brownies and cut them into small squares, then add to the tins. You could also make Christmas candy or divinity for the tins as well.

9E737123-B886-4BFF-B5EC-E7BAC3B37FE6

VINTAGE RED TRUCK CERAMIC LOAF PANS

I buy these little loaf pans, every year from Old Time Pottery! I love to make my cream cheese banana nut bread and give out to extended family, dance teachers, neighbors and colleagues. I wrap them in cellophane and tie with a curling ribbon! EASY PEASY and everyone loves it! I am so happy to have found these that have the red vintage truck on them!

E458E2B0-FB12-4497-8D8A-06AD58735C83

OLD TIME POTTERY

You can find so many things at Old Time Pottery from wrapping paper to decorative boxes or the ceramic loaf pans! Old Time Pottery has so many options for this Christmas season! Plus, their prices are budget friendly and I am sure that you can find something to fit your budget this holiday season! If you have any questions or want a recipe, please don’t hesitate to reach out! I hope you and your family have a wonderful Christmas!

Love~Shae


Continue reading "CHRISTMAS GIFT WRAPPING IDEAS WITH OLD TIME POTTERY"

Creative Thursday’s Christmas Craft

Creative Thursday’s Christmas Craft

This year with my collaboration with King of Christmas, I knew I would be going neutral with my Christmas decor, which meant I would need to do a complete 360 and either make or buy new Christmas stockings. I went and checked a few of my fav decor spots and they were a no go for stockings. You know when you get that picture in your head of what you want and you can’t find it anywhere? I was feeling a little defeated, until, I got the idea to make my own stockings from painters drop cloth canvases. Say what? It sounds funny, I know, but I knew I could probably make 6 stockings for under $10! I actually only spent $2.98 on the Drop cloth because it was on sale!  I mean, my entire main living area of my home, has drop cloth ruffle curtains. I already had some left over drop cloths from when I made the curtains from our eat-in kitchen or i.e. playroom for our youngest daughter.

DA6B3B7A-CA97-4D62-9592-C6F3EE173A85

I knew I wanted fairly nice sized stockings. We have had some of our Pottery Barn Kids stockings for 17 years and they are a great size for Santa to fill! I decided to use one of those stockings for a pattern.

EE69CD56-E755-4AF9-AEA6-CCD556C8D008

I basically just laid the PBK stocking on top of the canvas, that I double folded, then added about 1/2 an inch for seam allowance and cut out. I took both pieces of canvas and sewed right sides together, then turned inside out and decided on the size that I wanted the ruffles to be.

4C699DA5-62B9-4585-9513-EEC000FB76B8

For the ruffles, I decided on the size, which was   6.5 inches in width by 20 inches in length with 1/2 inch seam allowance. I sewed down the raw edge then folded over, sewed down again and began the process of ruffling the canvas. If you have never ruffled before, its not hard, you just need set your machine to the loosest stitch and the widest stitch. Once you’ve run your stitch the whole length of your fabric, gently begin pulling the bottom (bobbin) thread.

24FCF1A4-B599-4790-901E-8D34CD2CB1B8

Next, begin slowly pushing your bunched fabric towards the end of your fabric until you have the whole fabric ruffled.

E1600BA4-53E5-41CF-AFAF-F4DB5A0EBE03

Next, I made the stocking holder loop. I used a  piece of 4×6 size of canvas.

D0359952-5C13-447A-AE76-97258ECDA58E

First I folded down the fabric on one side to the middle and then did the same for the other side.

748075A7-4C6A-4082-B104-0041D526EAAB

Next, fold over the entire piece in half.

211AF05E-3964-4156-8B0C-4A36E85B3B2E

Like this…

3866A688-8E26-4692-99C1-8861CCCC02A3

Then sew down the edges.

7DC1F363-C2AF-4EC6-A8DF-39A3EDFE2E69

Next, I turned down the stocking and decided on the width of the cuff, then sewed the edge with a 1/2 allowance.

21F8638B-2FD7-41E2-A3FC-97AD3E15D238

I decided to go ahead and attach the stocking holder, then sew on the ruffles.

B4FA7B79-B19F-473D-9477-F79B8829B09B.jpeg

Next on the agenda is sewing on the ruffle!

B40B42BF-CFF7-4EDD-B42E-CFA0BC8EFB4A

I also decided that I wanted to make stocking name tags! I knew we had some pine underlayment left from our faux shiplap wall we had just completed. I asked my husband to cut out 6 that were 5.75×2.75 plus drill a small hole at the top.

A8F573EB-F462-44E5-AEEB-DBE6575140D2I decided to stain with one of my favorite colors of stain, Minwax Dark Walnut.

077D3CB0-112C-42C2-B383-69FC77047225After lightly staining the front, back and sides of the name tags, I decided to use my Silhouette to add all of our names to each tag. I chose the font bromello then welded, printed on white vinyl then weeded (removed the negative space). 

18468693-6D4F-42CC-B3FE-8CE6310697CA
After finishing with the stocking name tags, I added twine for tying around the stockings. These cost me zero to make because I already had all of the supplies!
15BA993B-DAA4-4347-85F4-5D30E438D6FF.jpeg
We are done! What do y’all think? I absolutely am loving my neutral, very budget friendly Christmas decor this year! It definitely took some time to grow on me since I’ve had traditional for the past 20 plus years but our entire family is enjoying it.

DA6B3B7A-CA97-4D62-9592-C6F3EE173A85

Please check out my friends to see what Christmas Crafts they have come up with for  our monthly Creative Thursday’s! We have some pretty amazingly talented ladies, if I do say so myself!

Love, Shae

F777CF98-2CB7-4E19-82F6-11D3EF72BFDD

https://barnhousemess.wordpress.com/2019/11/19/christmas-creative-challenge

3084573E-1589-496B-8D8B-A51A62F87114

Creative Thursday ~ easy to make candy cane garland

89365AF3-837A-4D0B-803B-3977965A206E

Creative Thursday – Christmas Craft

6675FBF9-54A9-46EA-895F-5BB7175432EF

Creative Thursday: Classic White & Gold Framed Ornaments