Updating your Bathroom on a Budget

Updating your Bathroom on a Budget

Updating Your Bathroom on a Budget: It’s EASY!

[This post contains sponsored links. The items featured and linked, in this post is provided by LNC Home; all opinions and reviews are my own.]

E825101D-6403-4655-93A2-B481B5BB15CB

Bathroom Mini Reno on a Very Small Budget: Make the impossible, possible!

We had one last item to add to this bathroom after a mini bathroom renovation and that was our 3 Light Modern Wall Sconce  .

6564D7AB-DE08-465A-9552-ED3B78D436F0

The before picture below is the day we purchased our home. It has really come so far on such a low budget!

3B6F1B3E-6FCB-44F7-B4FC-CD50C6C7945C

Decor Through the Years: Styles can Change!

I would like to say that my decor tastes and styles have changed over the years. Some may believe I am scared of color because most of my home is now neutral but if you look closely, you will see color throughout my home! The photo below is what our bathroom looked like before the mini bathroom reno began. We had a very bright pink in the bathroom along with a black and white accent colors. Paris was the theme that my girls wanted! 

95D417D3-D200-4815-A45D-E4AEED1726C9

We decided to have a very small budget when it came to this mini reno, since it was the upstairs bathroom and is rarely used!

Budget Reno Details: DIY’s

For this mini reno, we removed the popcorn ceiling along with patching, painting the ceiling. I painted the walls in Lazy Gray from Sherwin Williams. I also painted all the baseboards, window and door with Ibis White from Sherwin Williams. I had the trim paint on hand.

42FB4C32-7B94-476E-AD7C-9DB4188DE9F9

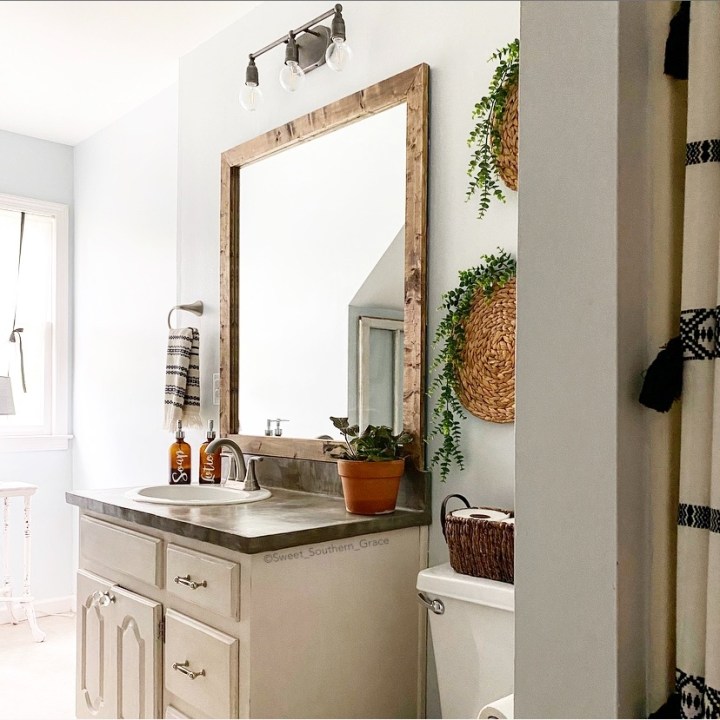
I stripped the varnish/black paint off the vanity cabinet and painted the inside and outside with my DIY Chalk Paint. I applied a product called Ardex to the existing countertop, which is similar to concrete countertops. I added three coats of a clear sealer on it as well!  I did purchase new knobs and drawer pulls from Hobby Lobby when they were 50% so they were only $10! I re-used the existing shelf liner to the inside of the drawers and cabinet.

FBB58AB4-9CDE-4247-A5B6-2610048F3D57

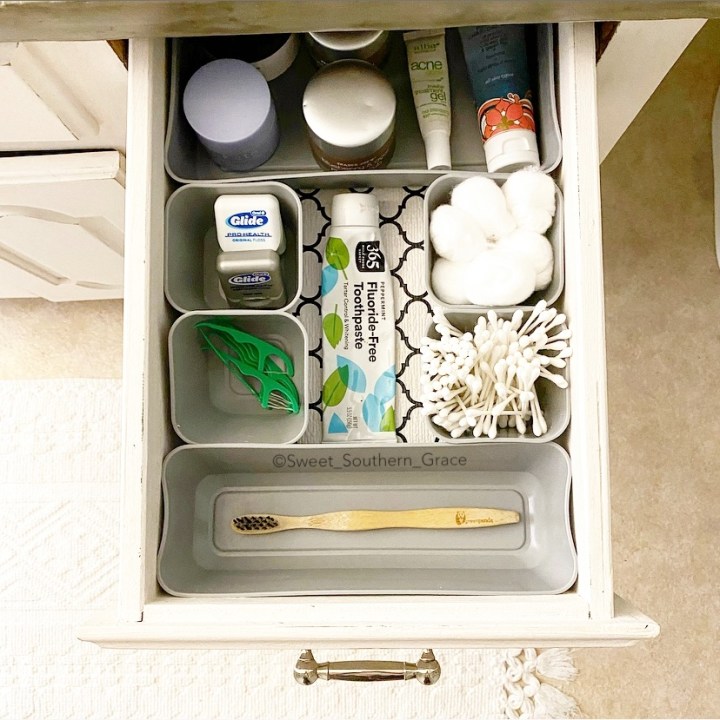
I purchased small plastics bins to help organizer the inside of the drawers and cabinet form Target. They were very budget friendly at $2 for a four pack!

7906D9C2-E8AE-4393-8603-105B170ACA65

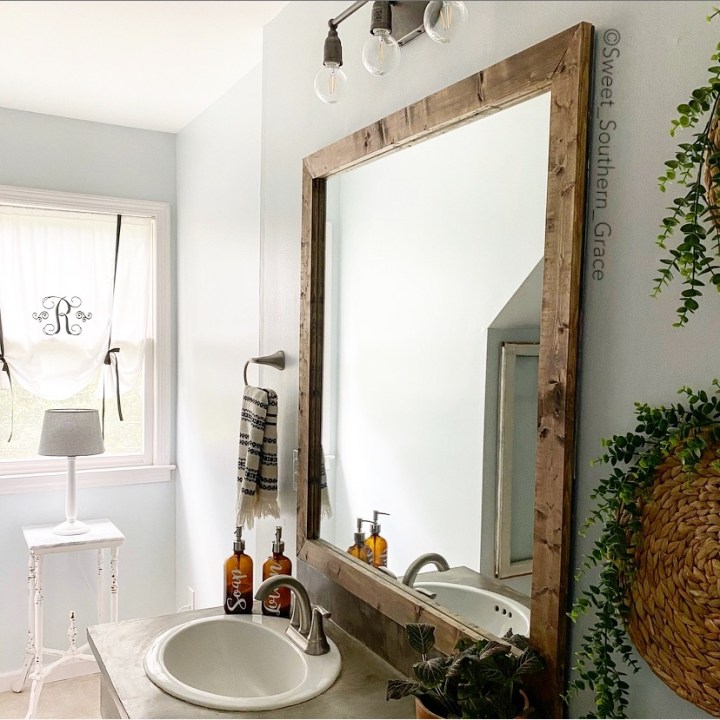
My husband made a frame for the existing mirror and I stained it. The wood and stain were items that we had on hand from other various projects!

7B77E678-0948-4C2A-88FF-5025F9043520

We also added new hardware throughout the bathroom! I added a shower curtain and rug from Wal-Mart. I also added several baskets/greenery from Hobby Lobby. Most all of the decor were items that we basically already had on hand. The amber glass dispensers  were only $14 from Amazon. I added the labels with my Silhouette Machine!

2C572FAB-53A8-4B70-913E-9CD813AFB3EA

I painted the little table with my diy chalk paint. It was an inherited item from my Mom-Maw. I did purchase a new lamp shade for $8 for the white lamp. I sewed the curtain and added the monogram. (I made the curtain years ago.)  We hung a vintage window that we got for free off of Facebook Marketplace. The wood frames with greenery were a DIY with items we already had on hand. We found the hanging light fixture at a local thrift store for $6, several years back. I spray painted it black with spray paint that we already had on hand.

Budget Friendly Bathroom Light Fixture: 3 Light Modern Wall Sconce

Lighting is a huge part of any room transformation. A well-chosen vanity light becomes a focal point, setting the scene.

0B4262F1-3A7F-4CB0-8A60-F04CD286BE1E

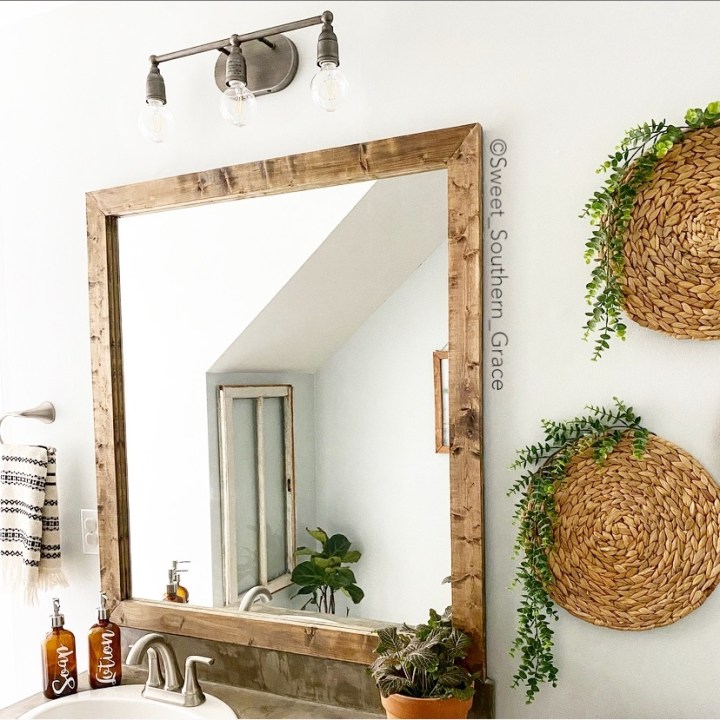
I knew I wanted to replace the existing vanity light because it did not flow with our mini reno. Here is where my friends over at LNC Home into play! I found the  3 Light Modern Wall Sconce and knew it would be perfect for our bathroom!! Plus it was the finishing touch to this mini bathroom reno!

4C25E70D-B63B-43A2-878B-245769151364

3 Light Modern Wall Sconce: Farmhouse Style

This vanity light is made of metal with a silver painting finish. The simple lines and colors are full of retro style, creating a great atmosphere for you, which is ideal for your farmhouse style bathroom, kitchen, bedroom, doorways, barns and entryway.

55BB658B-28DB-4589-8A72-E341901A7D17

One of the best things about this light fixture is that it is budget friendly at only $89.99!! We are so happy with how the 3 Light Modern Wall Sconce finished up our mini reno in our girls bathroom!! Please check out LNC Home! They have many decor items for your home at budget friendly prices; from rugs to light fixtures to furniture and cushions! I know you will enjoy browsing their store!

Total Cost: Budget Friendly

Ardex-$30

Clear Sealer for Countertop-$25

Citri Stripe-$0-Had on hand

Cabinet & Table Paint-$0- Had on hand

Lazy Gray SW Wall Paint-$45

Cabinet Knobs/Pulls-$10
Plastic Storage Drawer Bins-$6

New Fixtures/Hardware-$0-Collab with Pfister

Amber Dispensers-$14

Lamp Shade-$8

Shower Curtain, Rug and towel-$50

Other Decor Items-$0-Had on hand

Hanging Light Fixture-$0-Had on hand

3 Light Sconce-$0-Collab with LNC

Total-$193

Hope you’ve enjoyed reading about our mini bathroom reno on a budget! We are making our home decor dreams come true, one at a time and of course on a small budget!!

❤️~Shae

Farmhouse Word Stacked Books

Farmhouse Word Stacked Books

When my friend Terrie from Decorate & More with Tip asked me if I would like to join a blog challenge for word stacked books, of course I would agree!! My first thought was that I would love to make a set of these books for my sister-in-love, who just built a new home with her husband, last year. We had not given them a house warming gift, so I thought this would be perfect!

4143331E-A0A9-4E9B-BCF3-8999D84836C6

A little bit of family history with this key. This key was found by our oldest two daughter’s when they were little in their Grandmother’s home. She is my husband’s Grandmother, whom we called Big Grandma & who is our youngest daughter’s namesake. We were cleaning out her home, getting ready to renovate it and we were allowed to take things from her home that we thought we would like to have. One of the girls found this key and I’ve had it in my jewelry box now for around 14 or 15 years.. not knowing really what to do with it, but I knew one day an idea would come and I could have a way to honor this key, per say. I am not sure what this key went to or any significance behind it. I am thinking it went to…maybe an armoire or hope chest.

86D74D28-73F9-46F5-807D-E9E171BC2935

I headed to our local Dollar Tree for the books. When I make a set of these books, I like to tear off the front and back covers of each book, along with several pages as well.

AF5EC47B-9C48-4694-A073-9880E98FB506

I used my homemade DIY chalk paint recipe that you can find on our youtube channel. I did a light layer of paint on the spine of each book. I did not saturate my paint brush with paint, but I didn’t dry brush it either. I wanted some of the spine to show through. I did a heavier paint layer in between each book, to help adhere to each other, acting as “glue”. On the top and bottom of the book set, I painted a light layer so that some of the wording would show through.

EE56EDFC-B001-483F-B1EE-DFCA9240B345

After the books are dry, I grabbed my stamps and black ink that I purchased from Hobby Lobby. Don’t forget to purchase when they have those for 50% off or use your 40% coupon.

CD7C3317-422D-4631-BEFF-5636A9BBAC01

I decided I wanted to stamp the words, “Home Sweet Home”, onto the spine of the books. I thought it was a fitting saying for a house warming gift.

CB1582A4-03DB-4B5C-ACAB-3D7EC9AC5D9E

After my stamped letters where dried, I headed to my ribbon stash and I used this light khaki colored ribbon from Hobby Lobby and added the twine.

5063B44F-1F8F-454F-A497-750D7F9A7420

I decided to tie the ribbon, a little off centered and incorporate the key with the ribbon. After I tied the ribbon, I made sure to heat seal the edges of the ribbon.

E4B37E0D-5855-40E7-94F6-E66375F75E9A

I can’t wait to give this set of stacked books to my sister-in-love. I hope she can find a place in her home for it and every time she looks at it, she thinks of their Big Grandma.

464F0F10-8FCC-4B5B-87F3-86C7B7ABA1CB

Please check out all of my friend’s and how they made their own diy stacked books! We are a diverse group with many talents! I know you will not be disappointed!

Love, Shae

Terrie over at Decorate and More with Tip
Kelli over at Olympic Nest
Patti over at Pandora’s Box
Jessica over at Jessica B Simmons
Sheri over at Sheri Martin Interiors
Dani over at The Taborhood
Danya over at Just Another Farmhouse
Teresa over at Through a Vintage Door
Hollie over at Heyitshod
Shae over at Sweet Southern Grace
Dori over at This Full Life of 5

How to Decorate with Books in Your Home Decor

Clearance Challenge- Aging Terra Cotta

Clearance Challenge- Aging Terra Cotta

I have teamed up with several of my blogging friends to a Clearance Challenge. We were challenged to find a home décor item under $15. I had been eyeing the succulents at Wal-Mart for awhile. About a month ago, I noticed that they were on clearance for under $4.00 each, so I headed back to Wal-Mart  to find my succulent.

CE9509F1-F1DF-4A4A-B275-00D50DCAF3C8

Now, these succulents definitely needed some tender loving care! This one looked like it had been over watered. I am hoping I can bring it back to life! I did not like the pot that it was planted in, so I purchased a new terra cotta pot for under a dollar! I decided to “age” the terra cotta pot.

DACAB9F8-0BFC-4492-B347-07B69A04A91B

Now, y’all know I love me some chalk paint!  I decided to use my DIY  chalk paint recipe to age my terra cotta pot. My recipe is 1/2 c Sherwin Williams latex paint in Extra White, 1/4 c baking soda and 1/2 tbsp. water. Mix well until there are no lumps.

AE6E96DA-268B-4FE7-A495-4ADC1863B7A6

Apply one thick coat of chalk paint with a dry brush. With a damp rag, remove some of the paint and allow the remaining paint to dry.

26C57EFE-4DBC-4D01-9E79-FE32EC835FA7

At this point, you could leave it or add one more coat. I chose to add another coat. I painted another thick layer.

BFB2AB38-DF2F-45B2-B1C3-5B59D0DD95F9

Once the second coat is tacky to the touch, rub the paint off with your fingers. I also used the damp rag to help achieve a more chippy finish. Please excuse the black spray paint on my fingers. (Project from this morning.)

5AFBF4B6-73FB-4107-8CB6-7AEB7BF5DBC7

Here is the finished result! I love how it turned out! For this Clearance Challenge, I spent $3.50 on the succulent from Wal-Mart and $0.74 on the new terra cotta pot. The painting supplies, I already had on hand. Total spent with tax is $4.60!

FD5B55A7-40B6-45FA-A483-591522B0C124

Hope y’all enjoy our Clearance Challenge! Love~Shae

Terrie over at Decorate & More with Tip
Emily over at LeCulitivateur
Tara over at Stilettos And Shiplap
Shae over at Sweet Southern Grace
Dori over at This Full Life 5
Jodi over at The House House Blog
Lindsay over at The Farmhouse Eclectic


DIY Chalk Painted Furniture

F13B026E-1399-46D7-9E85-1F726F8A64DB

Have you been searching for the perfect diy chalk paint recipe? I have a tried and true recipe right here! The best thing is it is very budget friendly for under $45!! Last week, I decided that one of our daughter’s furniture could use a face lift, per say. After all, this furniture is a good 15 years old. We have moved a few times and it had a few dings in various spots. Those natural “dings” on the furniture would be perfect for chalk painting! I could sing chalk paint praises, all day long! It is the most hardiest paint that I have ever used! I absolutely love it!

CHALK PAINT RECIPE:

1 c Latex Sherwin Williams Ibis White

1/2 c Baking Soda

1 tbsp. water

E4F8F42D-E982-4674-BB9A-0D74A9FBF240

DIRECTIONS:

Mix 1 c paint and 1/2 c baking soda very well with a plastic fork, until you see no lumps. Then your going to mix the water until incorporated well and there are no lumps.

I use a  Wooster Paint Brush  from Home Depot. You do not want to use a cheap paint brush because you will be left with bristles in your paint and lots of brush strokes. I can not stress this enough!

The very first thing you are going to want to do is clean your piece very well with a damp cloth. Next is lightly sanding your piece. The reason is so that it gives the chalk paint a little something to grab onto. After sanding, clean your piece really well with a damp cloth again.

66DA7EB3-3BB9-4DB2-8582-5F599B0A5BCC

As you can see in the pic above, this was before cleaning and sanding, it definitely needed to be cleaned.

When you begin painting, paint in the direction of the grain of the wood. So, if your wood grain is horizontal, you are going to paint, horizontally. If the direction of the grain of your wood is vertical, you will be painting vertically.

EA066D35-11BB-4379-9E24-3D78596C8A1B

When you are painting a long piece of furniture, like a dresser, I like to have one long paint stroke, at a time. I will start at the top and go all the way down and continue until the entire top piece is finished. Chalk paint dries really quickly, so you will need to work fast. When you have the entire piece painted with one coat, the paint should be dry within a couple hours, you can lightly sand over the first coat. You are going to be sanding in the direction of the grain of the wood. I use 120 grit sand paper for sanding.  I like to lightly sand in between coats because it will lessen the chance of having a lot of brush strokes. After each sanding, wipe down your piece with a lint free cloth.  Most pieces are going to need three coats of chalk paint, depending on how much coverage you are wanting for your piece. I always do three coats, with light sanding in between and wiping with a clean dry cloth.

225C7CFE-1D53-4714-9429-4B53C8926C3B

In the above picture, I wanted to point out that sometimes when you are lightly sanding in between coats, that your piece may automatically start to kind of distress itself. That is ok, so don’t let it worry you. After you have painted all three coats with lightly sanding in between, you are now ready to distress your piece. I don’t like super heavy distressing, so my distressing is somewhere in between light to medium distressed. To distress, you are just going to take your sand paper and lightly sand in the areas of your piece, as to where it would naturally wear.

Now you are ready for your wax! Waxing provides a wonderful layer of protection for your chalk painted furniture. I always use two coats of Martha Stewart Vintage Clear Wax  from Michael’s. It is under $10 with a coupon. Depending on the amount of items you are painting, will determine how much wax you will need. I needed two bottles of wax plus a little bit of another bottle. I painted six pieces of furniture. A bed with headboard and footboard, dresser with mirror, side table, desk and chair.  I think it is best to use a lint free cloth with your wax. You do not want to have any dust or hair that can get trapped in the wax, as you are applying or as it is drying. To apply the wax, grab a quarter sized amount and begin waxing in a circular motion until you’ve waxed your entire piece. Allow the wax to dry for several hours and apply a second coat. Once the wax dries, I allow 4-6 weeks for the paint to cure before setting any heavy items on my chalk painted furniture.

332A9732-CEC5-476D-9F44-FB8222185208

E4739214-A91B-4E2D-95A0-29B963E2E062

A6D4CF41-DD75-470A-927C-D1CFC1D155BBYou can also check out our You Tube Channel for a more detailed video of how to make your own chalk paint and painting your furniture piece.

Much love~ Shae