Clearance Challenge- Aging Terra Cotta

Clearance Challenge- Aging Terra Cotta

I have teamed up with several of my blogging friends to a Clearance Challenge. We were challenged to find a home décor item under $15. I had been eyeing the succulents at Wal-Mart for awhile. About a month ago, I noticed that they were on clearance for under $4.00 each, so I headed back to Wal-Mart  to find my succulent.

CE9509F1-F1DF-4A4A-B275-00D50DCAF3C8

Now, these succulents definitely needed some tender loving care! This one looked like it had been over watered. I am hoping I can bring it back to life! I did not like the pot that it was planted in, so I purchased a new terra cotta pot for under a dollar! I decided to “age” the terra cotta pot.

DACAB9F8-0BFC-4492-B347-07B69A04A91B

Now, y’all know I love me some chalk paint!  I decided to use my DIY  chalk paint recipe to age my terra cotta pot. My recipe is 1/2 c Sherwin Williams latex paint in Extra White, 1/4 c baking soda and 1/2 tbsp. water. Mix well until there are no lumps.

AE6E96DA-268B-4FE7-A495-4ADC1863B7A6

Apply one thick coat of chalk paint with a dry brush. With a damp rag, remove some of the paint and allow the remaining paint to dry.

26C57EFE-4DBC-4D01-9E79-FE32EC835FA7

At this point, you could leave it or add one more coat. I chose to add another coat. I painted another thick layer.

BFB2AB38-DF2F-45B2-B1C3-5B59D0DD95F9

Once the second coat is tacky to the touch, rub the paint off with your fingers. I also used the damp rag to help achieve a more chippy finish. Please excuse the black spray paint on my fingers. (Project from this morning.)

5AFBF4B6-73FB-4107-8CB6-7AEB7BF5DBC7

Here is the finished result! I love how it turned out! For this Clearance Challenge, I spent $3.50 on the succulent from Wal-Mart and $0.74 on the new terra cotta pot. The painting supplies, I already had on hand. Total spent with tax is $4.60!

FD5B55A7-40B6-45FA-A483-591522B0C124

Hope y’all enjoy our Clearance Challenge! Love~Shae

Terrie over at Decorate & More with Tip
Emily over at LeCulitivateur
Tara over at Stilettos And Shiplap
Shae over at Sweet Southern Grace
Dori over at This Full Life 5
Jodi over at The House House Blog
Lindsay over at The Farmhouse Eclectic


Chocolate Chip Toffee Cookies

Chocolate Chip Toffee Cookies


81B75467-6FF7-454F-9E9A-59B1FD84F74E

This is probably our family’s fav cookie recipe, at the moment! The bits of toffee jazz up our chocolate chip cookie recipe! The cookies are soft and chewy with a bit of a crunch on the outside!

INGREDIENTS:

3/4 c butter (1 1/2 sticks), room temp

1 1/4 c light brown sugar (packed)

1/2 c white sugar

2 eggs

1 tbsp. vanilla

2 1/4 c all purpose flour

1 tsp baking powder

pinch of salt

1/2 tsp cornstarch

1 1/2 c semi sweet choc chips

1 1/2 c toffee bits (Heath Bar Bits ‘o Brick baking pieces)

DIRECTIONS:

Preheat oven to 375 degrees. With your stand mixer, cream together butter and sugars on medium speed. Add eggs, one at a time. Add vanilla. Mix flour, baking powder, salt and cornstarch until just combined.

B6104009-96DF-4FA6-A0D2-FAEBEC7B3F5F


Add choc chips and toffee bits and mix until incorporated. I like to fold in with a spatula or my hands.

058B4E28-5AED-4F14-99C5-973F0938AF55


Drop by rounded 1 inch balls on baking stone or sheet and bake for 9-10 min for softer cookies (just beginning to brown on edges) or 11-12 min for crunchier cookies. Cool on wire rack.

EB56D9C3-0F2B-46F8-956C-5B807F533D64


DIY Flower Market Sign

12C063AB-0040-4AFA-BC7D-7568CBF88A90

I have been planning for months to make a mini flower market display in our entry way. I asked my husband to make the sign double sided and around 30×20 in size. He cut a sheet of plywood, in the size I needed, for the front and back of the sign. For the trim, he used a 1×1 pine board.

E60F79A1-550E-4BBA-B09C-8FF4452171CD

I painted the inside of the sign with Rust-Oleum Chalk Board Paint in School House Green. It reminds me of the color of the chalk board from when I was in school!

D224BCB0-2ED2-4D65-972E-3D36702D9E66

Next, I applied a white wash to soften the green up, just a bit. My technique for the white wash is to add a little water and a tad bit of paint. I use a rag and swipe over the paint in a rainbow pattern!

E6EFD7AB-988A-4E5D-80E1-0079BD814B55

For the wording on my sign, I purchased a file from the Silhouette Store called Fresh Flower Market. I cut, weeded and applied the design to my sign.

898C91BF-4576-4848-BF29-01412A27C8A6

This is a simple diy and I love how it turned out! I have even used the sign on my front porch for décor!

Happy Spring y’all! Love~Shae

C403ADE0-1C1D-4A31-A021-B59739FDBBCE


DIY Chalk Painted Furniture

F13B026E-1399-46D7-9E85-1F726F8A64DB

Have you been searching for the perfect diy chalk paint recipe? I have a tried and true recipe right here! The best thing is it is very budget friendly for under $45!! Last week, I decided that one of our daughter’s furniture could use a face lift, per say. After all, this furniture is a good 15 years old. We have moved a few times and it had a few dings in various spots. Those natural “dings” on the furniture would be perfect for chalk painting! I could sing chalk paint praises, all day long! It is the most hardiest paint that I have ever used! I absolutely love it!

CHALK PAINT RECIPE:

1 c Latex Sherwin Williams Ibis White

1/2 c Baking Soda

1 tbsp. water

E4F8F42D-E982-4674-BB9A-0D74A9FBF240

DIRECTIONS:

Mix 1 c paint and 1/2 c baking soda very well with a plastic fork, until you see no lumps. Then your going to mix the water until incorporated well and there are no lumps.

I use a  Wooster Paint Brush  from Home Depot. You do not want to use a cheap paint brush because you will be left with bristles in your paint and lots of brush strokes. I can not stress this enough!

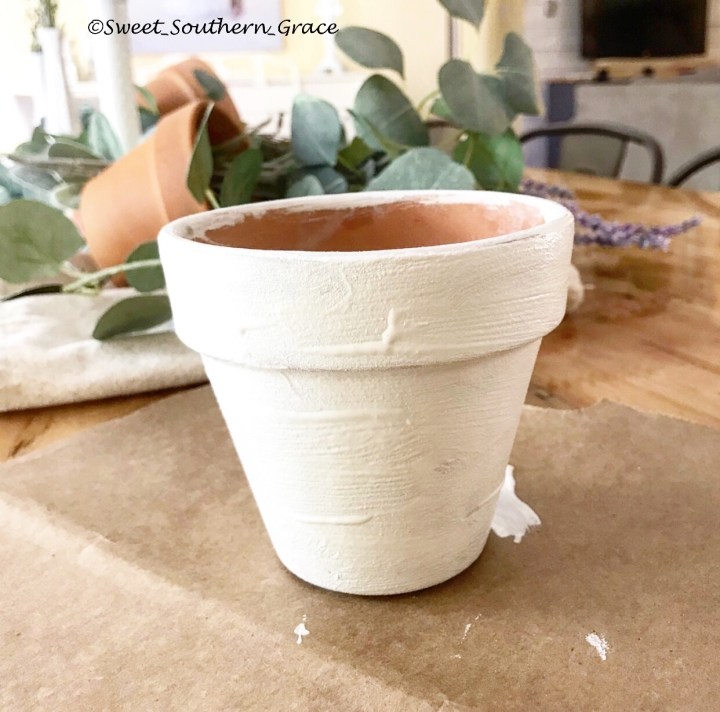
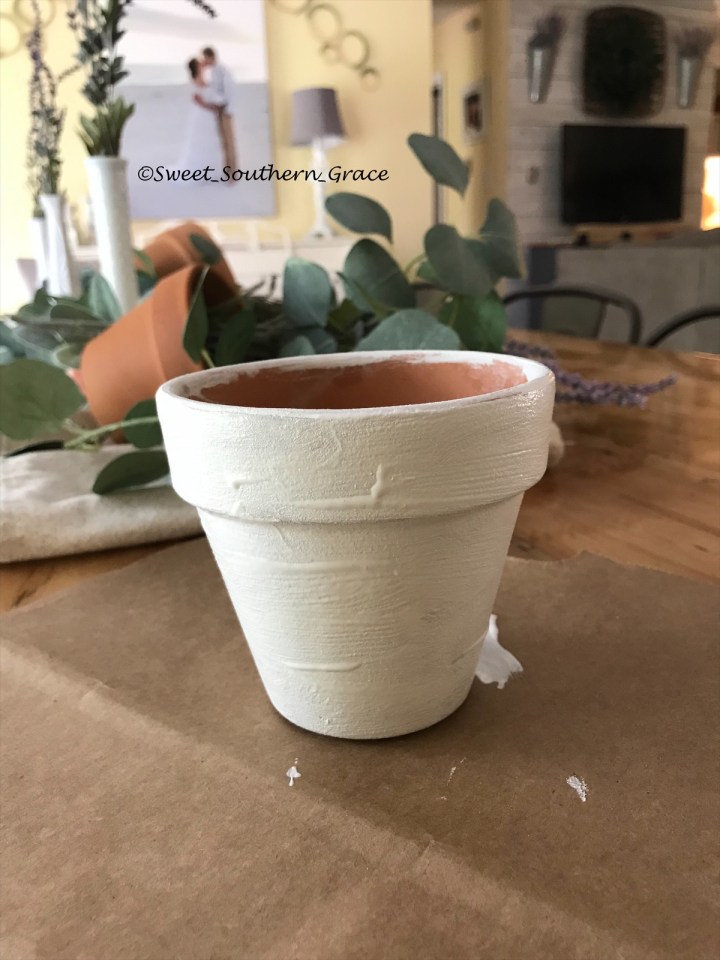
The very first thing you are going to want to do is clean your piece very well with a damp cloth. Next is lightly sanding your piece. The reason is so that it gives the chalk paint a little something to grab onto. After sanding, clean your piece really well with a damp cloth again.

66DA7EB3-3BB9-4DB2-8582-5F599B0A5BCC

As you can see in the pic above, this was before cleaning and sanding, it definitely needed to be cleaned.

When you begin painting, paint in the direction of the grain of the wood. So, if your wood grain is horizontal, you are going to paint, horizontally. If the direction of the grain of your wood is vertical, you will be painting vertically.

EA066D35-11BB-4379-9E24-3D78596C8A1B

When you are painting a long piece of furniture, like a dresser, I like to have one long paint stroke, at a time. I will start at the top and go all the way down and continue until the entire top piece is finished. Chalk paint dries really quickly, so you will need to work fast. When you have the entire piece painted with one coat, the paint should be dry within a couple hours, you can lightly sand over the first coat. You are going to be sanding in the direction of the grain of the wood. I use 120 grit sand paper for sanding.  I like to lightly sand in between coats because it will lessen the chance of having a lot of brush strokes. After each sanding, wipe down your piece with a lint free cloth.  Most pieces are going to need three coats of chalk paint, depending on how much coverage you are wanting for your piece. I always do three coats, with light sanding in between and wiping with a clean dry cloth.

225C7CFE-1D53-4714-9429-4B53C8926C3B

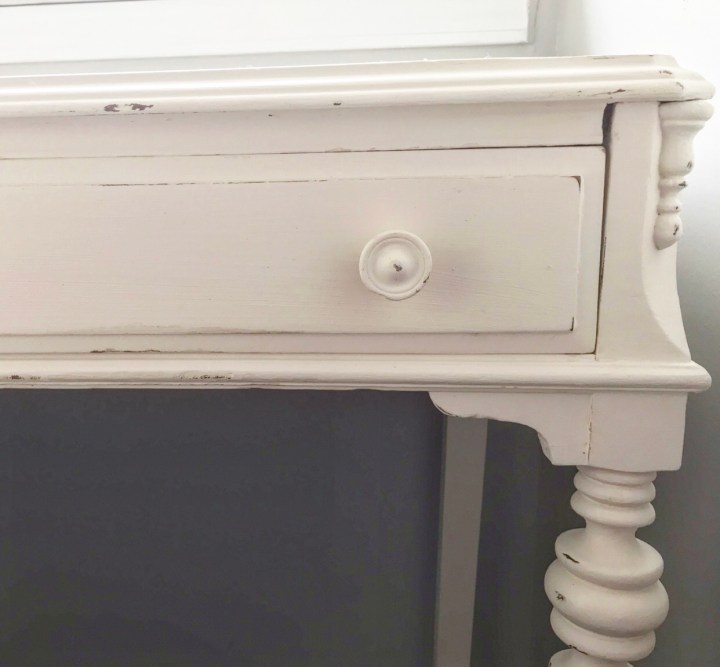
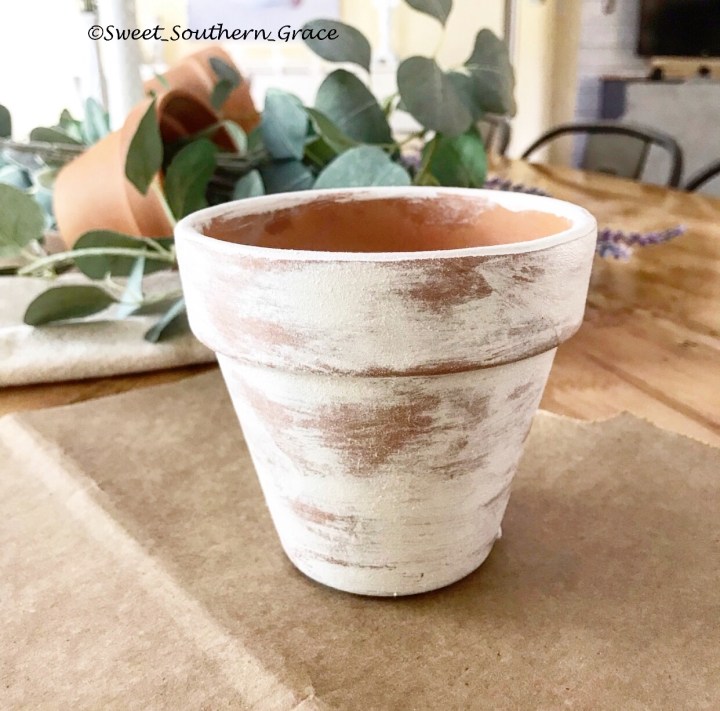
In the above picture, I wanted to point out that sometimes when you are lightly sanding in between coats, that your piece may automatically start to kind of distress itself. That is ok, so don’t let it worry you. After you have painted all three coats with lightly sanding in between, you are now ready to distress your piece. I don’t like super heavy distressing, so my distressing is somewhere in between light to medium distressed. To distress, you are just going to take your sand paper and lightly sand in the areas of your piece, as to where it would naturally wear.

Now you are ready for your wax! Waxing provides a wonderful layer of protection for your chalk painted furniture. I always use two coats of Martha Stewart Vintage Clear Wax  from Michael’s. It is under $10 with a coupon. Depending on the amount of items you are painting, will determine how much wax you will need. I needed two bottles of wax plus a little bit of another bottle. I painted six pieces of furniture. A bed with headboard and footboard, dresser with mirror, side table, desk and chair.  I think it is best to use a lint free cloth with your wax. You do not want to have any dust or hair that can get trapped in the wax, as you are applying or as it is drying. To apply the wax, grab a quarter sized amount and begin waxing in a circular motion until you’ve waxed your entire piece. Allow the wax to dry for several hours and apply a second coat. Once the wax dries, I allow 4-6 weeks for the paint to cure before setting any heavy items on my chalk painted furniture.

332A9732-CEC5-476D-9F44-FB8222185208

E4739214-A91B-4E2D-95A0-29B963E2E062

A6D4CF41-DD75-470A-927C-D1CFC1D155BBYou can also check out our You Tube Channel for a more detailed video of how to make your own chalk paint and painting your furniture piece.

Much love~ Shae

Milk Glass Collection

1337DB83-BCAE-472C-B1C2-075FCA494E3F

I fell in love with milk glass a couple years ago, thus the beginning of a new found collection! I originally began collecting milk glass so I could show it off in a corner cabinet that I am dreaming of! We have plans to build one soon! For now, I enjoy decorating with milk glass throughout my home. Everything you see pictured in the first pic, I actually purchased at an estate sale for $15!! It was a steal!

AAE81633-FA74-4D3C-A9AD-EC443FEF75A4

Over the weekend, I visited my favorite local antique store, called the Brass Bear Antiques. I was on the hunt for a few items and one of those items was milk glass vases! I did find several milk glass vases! Score! Reasonably priced for $4-$6 a piece!

C91B7154-13F8-4846-A4C1-60377FD491CD

I feel like there are so many different ways to display your milk glass. From a spring tablescape to a corner hutch or on a tray in your kitchen! Add greenery or flowers and you’ve got a gorgeous, simple vignette!

E1662CAF-4163-4063-B99A-44500E650283

Do you ever purchase a antique piece and wonder where it has been? What is the history behind the milk glass? How many owners did it have? Was it given as a special gift to someone for a birthday or a “just because” gift? Do any of ya’ll collect anything that is dear to your heart? Do you have a special antique that was given to you by a family member? You will find many antique pieces, throughout our home. Many of those pieces were given to us by our Grandparents.

XO~Shae

Valentine’s Tablescape

IMG_2296

Happy Valentine’s Day! We have had a tradition in our family that started with our oldest daughter when she was little. My husband would not only buy me a gift but he would pick out a gift for each of our daughter’s. I remember one year he bought us matching monogrammed Tiffany bracelet’s. I will always remember that Valentine’s as one of my favorites!

IMG_2434

This year, we decided to do things a little differently! Each daughter has one of the pink ribbon boxes with a small trinket in it. My husband and I decided on a gift for each other that would benefit our entire family for years to come! We bought a camper!! No, it’s not one of those shiny, new ones! It is definitely a fixer upper! Oh, the memories we will make, just the six of us!!

IMG_2435

I made the table runner with craft paper from Hobby Lobby. I used a chalk marker pen to hand letter the words, “love you” directly onto the paper. All flowers and greenery are also from Hobby Lobby. This is just the second tablescape, that I have ever created and boy do I love it!!


I hope you enjoy this day with your significant other and your children as well. Happy Valentine’s Day from our family to yours!

Much Love~ Shae!

Homemade Doughnuts

IMG_2204

We love homemade doughnuts in our house! These doughnuts are crispy on the outside and creamy on the inside! I promise they are not so intimidating once you make them! It is so worth the time and effort!

INGREDIENTS:

2 envelope’s of rapid rise active dry yeast

1/4 cup warm water, around 90 degrees

1 1/2 c lukewarm milk, around 90 degrees

1/2 cup cane sugar

1 tsp pink Himalayan sea salt

2 eggs

1/3 c butter

5 c unbleached all-purpose flour, divided

1 quart coconut oil for frying

GLAZE:

1/3 c butter

2 c powdered sugar

1 1/2 tsp vanilla

4 tbsp. hot water, as needed

DIRECTIONS:

Sprinkle yeast over warm water and let stand until foamy. About 5 minutes. Mix together yeast mixture, milk, sugar, salt, eggs, butter and 2 c of flour, in mixer. Mix for a few minutes at low speed. Beat in remaining flour, 1/2 c at a time until the dough no longer sticks to the bowl. Knead for about 5 minutes or until smooth and elastic. Place the dough into a greased bowl and cover. Set in a warm place to rise until doubled. Dough is ready if you touch it and the indention remains.

Turn dough onto a floured surface and gently roll out to 1/2 inch thickness. Cut with a floured doughnut cutter. Let doughnuts sit out to rise again until doubled. Cover loosely with a cloth.

Melt remaining butter in sauce pan over medium heat. Stir in powdered sugar and vanilla until smooth. Remove from heat and stir in 1 tbsp. water at a time until glaze is somewhat thin, but not watery. Set aside.

Heat oil in large skillet to 350 degrees. Slide doughnuts into oil with spatula. Turn doughnuts over as they rise to the surface. Fry each side until golden brown. Remove from oil and drain on wire rack. Dip doughnuts into glaze while still hot and drain off excess. Keep wax paper underneath your rack’s for easy clean up.

Hope ya’ll enjoy the recipe!

Love,

Shae


Farmhouse Half Bath Makeover Under $180!

img_2077

Last weekend, my husband and I decided to do a mini makeover on our half bath. Shiplap, shiplap and give me all the shiplap!!

41B9BD40-8108-401F-8913-BB96981B9C84

To make this a budget friendly makeover, I used faux shiplap called pine underlayment. It is sold by the sheet for $15 for a 4×8 sheet. My husband ripped the boards into six inches wide and we got eight boards out of each sheet.

9090418A-6CA3-4247-90F1-F824044B635E

We needed five boards for this bathroom and installed them with a nail gun.

Home Depot Stock Photo

C4531C76-3DC0-44FF-8FF8-AD3FAC911C31

For the corner, we used a strip of corner moulding.

8CEBC92F-66A2-430E-9DBB-FAB6C0978B5E

I also left all of the nail holes after installing because I loved the character and charm that it gave to the room!  After installing the boards, I painted with Sherwin Williams in Base White. The total cost of the wood we used was $80!

img_2080

Since this was such a small space, I was having a hard time finding a mirror that was the right size and that was in my budget.

Home Depot Stock Photo

49B0A340-9FB6-4ADE-BA5E-84F6A53F4F40

I had an idea to buy just a plain builders grade mirror with no trim and I found one at Home Depot for $25! We then used leftover antique wood  for the mirror frame. It was the same wood we used for our table and the shelves.

img_2078

We decided to purchase a light fixture along with a towel and tissue holders. This entire project cost us right around $180! Look below for the before shot!

img_2083

Thank you for taking the time to stop by and read! I would love to know your thoughts or answer any questions you might have! Have a fabulous day!

DISCLOSURE POLICY

DISCLOSURE POLICY

This is a personal home decor blog, written and edited by me, Shae.  For questions about this blog, please contact sweet_southern_grace@yahoo.com. 

Affiliates disclaimer: Please know that I sometimes use affiliate links on my blog and that means that I may make a small commission on something you purchase at the corresponding product site, however; that product will not cost you any extra because of this affiliate link. Just remember I only share/link things on my blog that I personally have used and love.  I am grateful for all of your support!!

This blog may accept forms of cash advertising, sponsorship, paid insertions or other forms of compensation. 

The compensation received will not influence the content, topics or posts made in this blog.  All advertising is in the form of advertisements generated by a third party ad network.  Those advertisements will be identified as paid advertisements. 

I may occasionally be compensated to provide my opinion on products, services, websites and various other topics. Even though I may receive compensation for posts or advertisements, I will always give my honest opinion based on my personal testing and/or use of the products.  The views and opinions expressed on this blog are solely my own. Any product claim, statistic, quote or other representation about a product or service should be verified with the manufacturer, provider or party in question. 

This blog does not contain any content which might present a conflict of interest.

PRIVACY POLICY

The owner of this blog does not share personal information with third-parties nor does Sweet Southern Grace store information collected about your visit for use other than to analyze content performance through the use of cookies.  The owner of this blog is not responsible for republishing of the content found on this blog on other websites or media without permission.

DISCLAIMER

All information provided for projects is from my own personal experience. I am not a certified contractor, electrician, plumber, ect. Before attempting to do any project, please be sure to follow all safety procedures, building codes, ect in your area. If you feel uncomfortable with any project, please seek professional assistance in the specific field of expertise. 

ABOUT ME

Hey y’all! My name is Shae and I grew up in sweet home Alabama! I graduated high school at sixteen and began going to college to study child psychology. (Years later, decided to study to become a pediatric neurosurgeon.) I met my husband at work, so I essentially married my high school sweetheart, at the tender age of seventeen. A year later we had our first daughter and I guess, as they say, the rest is history. We have been married for TWENTY-FIVE years with four daughters, two Son-In-Loves, two grands, two pups and a slew of FARM animals. My husband and I are a powerhouse when it comes to working together on our DIY’S for our home. I love to design and he loves to build! We are currently working on a dream of ours-SELF-BUILDING our barndominium! Currently on year two! Follow us on TikTok or IG link below!

BFDCD94F-6205-4412-8C62-5F04AB5E97AF

MY VISION FOR SWEET SOUTHERN GRACE

My vision for Sweet Southern Grace is a dream of mine, one that I truly love sharing with you! This site will combine so many of my passions. A few of those are faith, family and farmhouse décor. Sweet Southern Grace is a place for me to share to my home, recipes, decorating tips, inspire others, DIY’S and much much more! I am honored that you have taken the time to stop by Sweet Southern Grace. Let me know if I can do anything to help you in any way!

Sweet Southern Grace is on Instagram. Link below.

https://www.instagram.com/sweet_southern_grace/