Sertodo Copper

[This post contains sponsored links. The items featured and linked, in this post is provided by Sertodo Copper; opinions and reviews are my own.]

Sertodo Copper: Benefits

Did you know that copper has anti-microbial proberties? I also can appreciate that 65% of all copper mined today has been recycled over and over to make new pieces! I enjoy having a product in my home that is anti-microbial and is recycled!! 

E68D7D2E-891A-468C-BEAD-CEDC39A579A8

Sertodo Copper: History

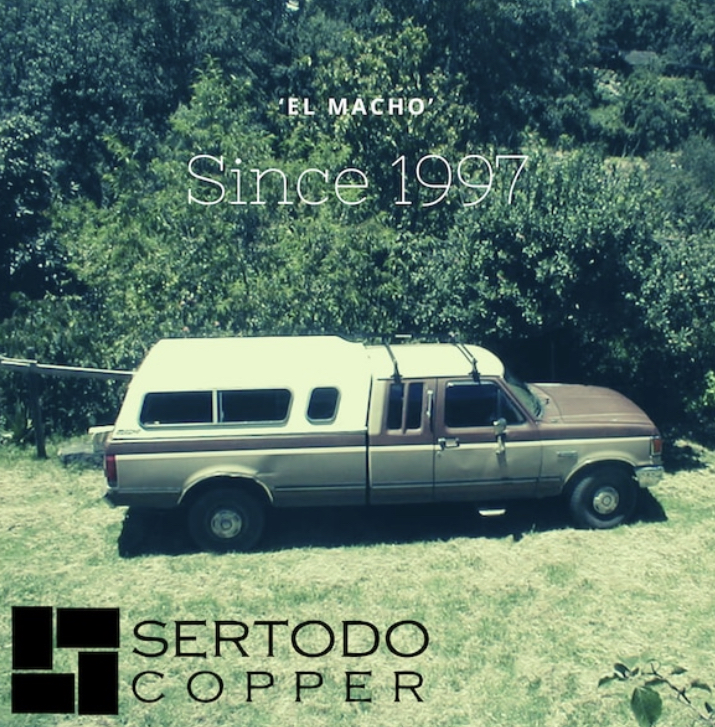
Over 23 years ago, Jonathan Beall founded Sertodo Copper and began selling it throughout the United States  from the back of his truck! He even nicknamed his truck “El Macho”.  Since 1997, Sertodo Copper has been bringing the highest quality copper goods made by the master artisans in their shops located in Austin, Texas and Santa Clara del Cobre, Michoacan.

cdc681dc-5746-4634-a186-479df0f64949

Sertodo Copper products are designed to become heirlooms for generations to use with cooking, socializing and enjoyin with family and friends. The first pieces that Sertodo Copper sold in 1997 are still in use today because the first customers are still customers today!

C9486BDC-F713-4D80-8E62-504B688D3B21


Whipping Egg Whites in Copper Bowls

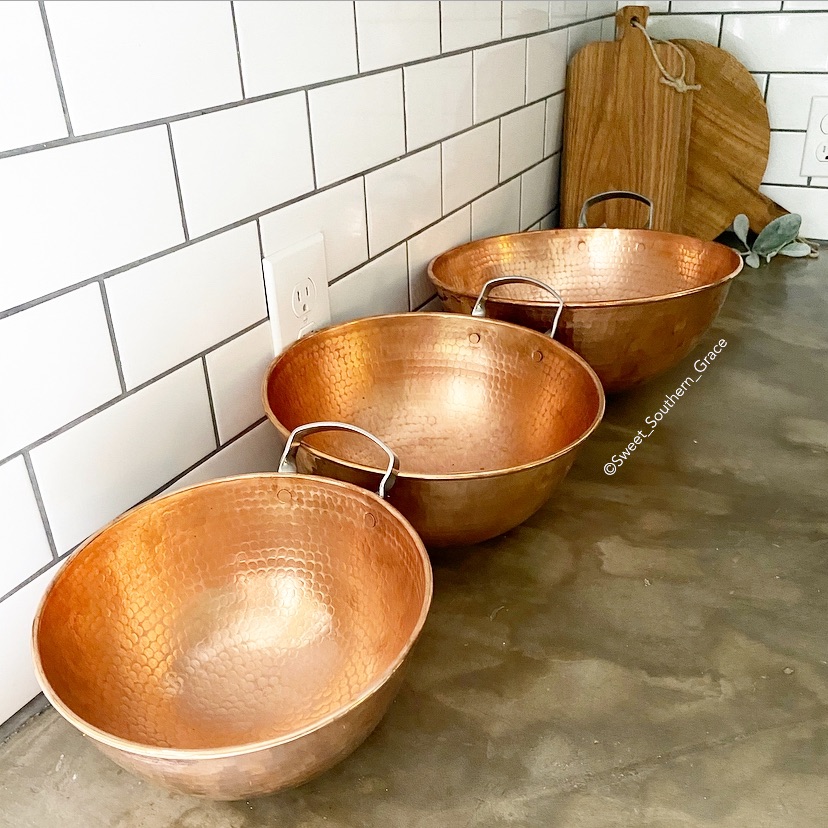
The really cool thing about whipping egg whites in a copper bowl is that as the whisk hits the bowl, tiny bits of copper break off from the surface of the bowl and mix in with your egg whites. Since copper can bind sulfur groups, those tiny bits of copper bind to the egg white proteins and therefore, sulfur groups are unable to form the strong disulfide bonds that can leadd to gritty, dry whipped egg whites. The egg whites whipped in a copper bowl stay glossy and firm without as much risk of becoming grainy or overwhipped. Pretty cool, right! So tell me, have your tried whipping egg whites in a copper bowl?

Recipe: Whipped Egg Whites

It is best to use fresh eggs, since the proteins are more conductive to forming an airy, porous foam when they are new. Seperate your egg yokes from the whites.  If you accidently drop some yolk into the egg whites, the fat will prevent the egg whites from foaming up.  To avoid this, use two seperate bowls-one for yolks and one for whites.  Place your egg whites in your copper bowl and begin whipping the egg whites with your whisk.  As you beat, do not rush adding the sugar. The slower you add your sugar, the better it will dissolve.  I recommend using one tablespoon at a time.  Also, take weather into account, as it is best to make meringues on a dry day. On humid and hot days, they can become limp or sticky.

Ingredients:

* 4 large egg whites

* 1 cup sugar

*1/2 tsp of cream of tartar IF you do not have a copper bowl.

Directions:

Beat egg whites until foamy with a whisk or mixer. If you do not have a copper bowl, now is the time to place the cream of tartar into the foamy egg whites. Try not to overbeat the egg whites at this point or they will have a harder time combining with your sugar.  Slowly add the sugar, 1 tablespoon at a time. Beat until you no longer hear the sugar in the egg whites. (No sound of the sugar hitting against your bowl as you mix.) Once all of the sugar has been added, you can stop worrying with overbeating. Beat until stiff peaks form. How to tell if you  have stiff peaks? Test by lifting your whisk from the bowl. The peaks of the egg whites that rise as you lift should stand straight up.  Also, as you tilt the bowl, the whites should not slide. You should not see any clear watery egg at the bottom. Double check to make sure the sugar is dissolved. Pinch some meringue between your fingers. It should feel sliky and smooth. 

Sertodo Copper: My Favorite Copper Pieces

I am loving their Bisotun Water Pitcher! I think it is a great conversation piece as well! 

A6D0CDC8-050E-4EBF-A1B9-09E6EA1972A3

I also love their Alicante Paella Pan. Perfect for whipping up something for dinner! 

15061220-B128-4382-BE9E-B0926F38FDC4

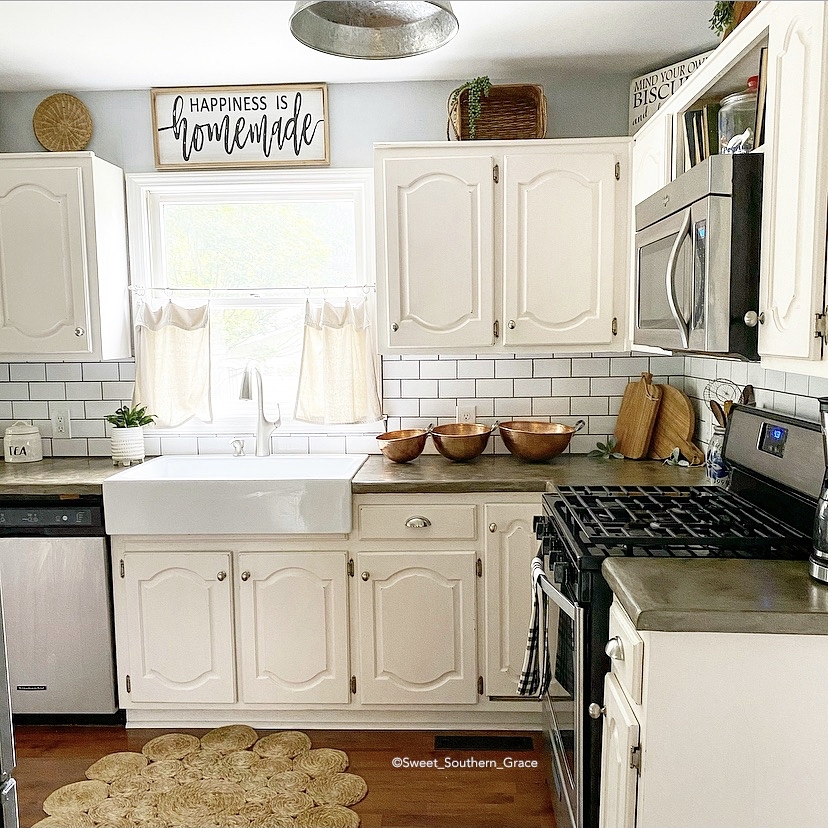
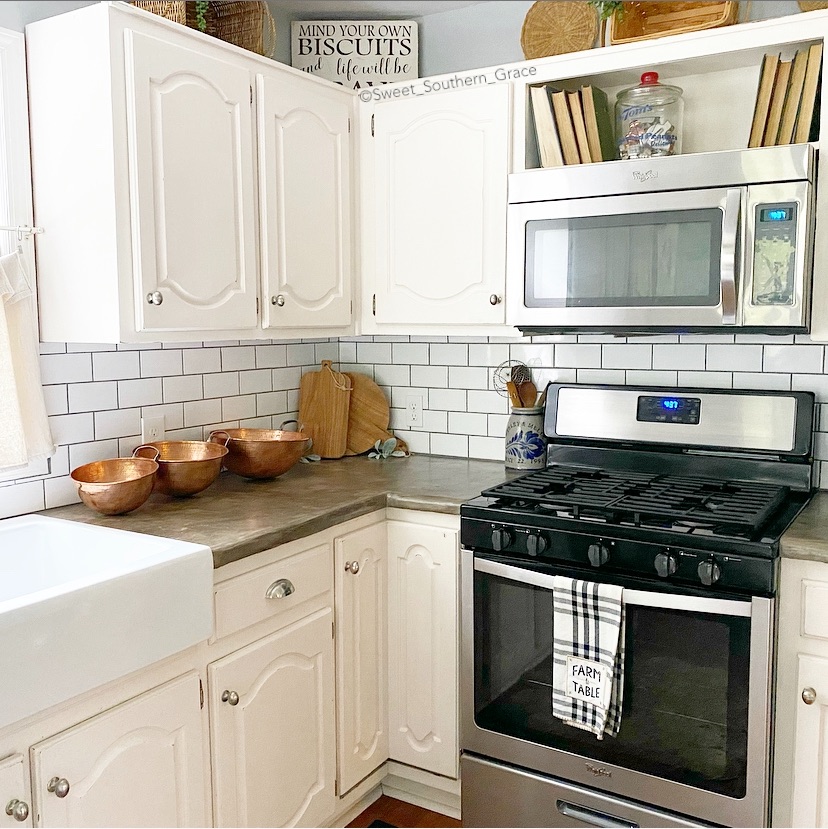
Of course, I love my Sertodo Copper! Perfect for the meringue recipe!

C9486BDC-F713-4D80-8E62-504B688D3B21

I hope ya’ll have enjoyed reading about the benefits of copper, the meringue recipe and  about the history of Sertodo Copper. Please check our thier website. I know you will love  their copper!

❤️~Shae 

069BE719-0080-46D7-98AC-6A0E4F637C88

Refresh For Less Challenge with Kirklands

Refresh For Less Challenge with Kirklands

Refresh For Less Challenge with Kirklands

[This post contains sponsored links. The items featured and linked, in this post is provided by Kirklands; all opinions and reviews are my own.]

D4A3AF63-7E7F-4E87-9D49-3D4F56CD4A6E


Challenge Deets:

Kirklands challenge was to buy four items under $100 to refresh a space in my home!

Challenge Accepted: Shopping Time

When I arrived at my local Kirklands, I made a quick loop around the store then decided to do a refreshed space in my kitchen!

B394B1BC-B6D9-491B-A3D6-FCD80BDF2FCC

Ceramic Script Cookie Jar:

Since our kitchen is a Farmhouse style with whites and woods, I knew that the Ceramic Script Cookie Jar would be perfect in my kitchen! Plus, it was only $19.99!! If your kids are like mine, from the adults to littles, our family loves homemade cookies! What a  perfect way to savor that freshness with this cookie jar!

B394B1BC-B6D9-491B-A3D6-FCD80BDF2FCC

Ceramic Vinegar and Oil Dispensers:

As soon as I saw the  Ceramic Vinegar and Oil Dispensers for $19.99. I knew they would be perfect us! We love vinegar and oil on our salads, as we eat them almost every day! The dispensers match the cookie jar with perfection!

E3E3CECA-9F4B-4C76-920F-5DF7ACD88D88

Sansevieria Snake Plant: Farmhouse Black Checked Kitchen Towel:

I think my favorite find is the  Sansevieria Snake Plant for $29.99.  I love that it looks so real!! It has a silk finish on the leaves and it’s planted in a ceramic planter! This would look beautiful anywhere in your home, from the bathroom to a bedroom or the kitchen!

0045FB50-92E3-4289-A427-17002FA70830

Farmhouse Black Checked Kitchen Towel:

The latest item I picked up for the challenge was the Farmhouse Black Checked Kitchen Towel  for $8.99. It is so cute and farmhouse shabby chic! You could hang it over the handle of your stove like I have or over your farmhouse sink!

D4A3AF63-7E7F-4E87-9D49-3D4F56CD4A6E

Challenge Complete:

I enjoyed this Refresh For Less Challenge with Kirklands! All of my items were under $100!! Which item is your favorite? Let me know in comments! I hope you enjoyed stopping by!

❤️-Shae


Budget Friendly Kitchen Renovation

Budget Friendly Kitchen Renovation

Hey y’all! Have you ever wanted to update your kitchen on a budget with products that don’t break the bank? The hubs and I have recently updated out kitchen with Ardex concrete countertops, a white subway back splash, a white farmhouse sink and chalk painted cabinets. It took about three weeks for all of the renovations.

We started off by replacing our kitchen sink with a white farmhouse sink from Sinkology called the Josephine .

D9636D37-AF80-4F94-88E3-EB92F64A9F15

I have had visions of white farmhouse sinks dancing in my head since we purchased our home, 5 years! Isn’t she a stunning sight!!

0F93261B-2D9B-47E5-A4BE-E59877FC117F

Next, my husband cut off the backsplash of the existing countertops because we were adding tile.

19FACE16-F3ED-4930-9012-12A692A703FC

For the countertops, I used Ardex Feather Finish . Ardex is a self drying cement based finish that you mix with water and has a cake icing-like consistency.

First things first, it is best to remove everything from your cabinets, then apply a clear plastic cover and tape all the edges. Trust me, you will appreciate this later! All of the countertops will need a light sanding to help the Ardex adhere. I used a orbital sander and I also hand sanded in corners where the orbital sanded would not fit. Wipe down with a dampened cloth all your countertops.

To mix the Ardex, I used a plastic 1 gallon bucket and a paddle mixer. The directions for the Ardex is a 2:1 ratio with water. I found that was a little to thick for me and added just a bit more water. I liked it to be about the consistency of icing. I used a 12 in joint knife and a puffy knife for the smaller areas. In some areas like behind the kitchen sink, it was easiest to use my fingers with gloves on to smooth the Ardex out.

DE2D7294-1268-4627-957A-F004B49D03AB

After the first coat of Ardex is applied, it will need to dry for about 24 hours before sanding. Once dry, let the sanding commence! I’m not going to lie, it’s super messy but I promise it is well worth it!! Check out the layer of dust on my arm!

845B89AF-1AEB-40E7-BAF1-576CEA5E84A7

I used an orbital sander because I felt like the finish it gave was smoother than a palm sander.

C185A0D6-3715-4657-AB41-0EF1750F56B4

I can not stress enough to use plastic coverings on everything because if not, you will have a huge mess to clean up like I did! Learn from my mistake!

E1E6EA63-27CA-4ABB-BAA9-7B92667E213D

I sanded all the edges, corners and tight spots with a 60 grit sand paper. Next is to use a shop vac to vacuum all the dust form sanding. I also used a dampened cloth to remove any remaining dust from the countertop. I repeated these steps until I had three layers of Ardex on my countertop. After the countertop has dried for 24 hours, I applied 3 coats of Behr Low Luster Sealer with a paint brush.

9908535D-C577-4137-BCBC-95F42A2C7B02

I didn’t want a super shiny finish, so I made sure to purchase one that had very little shine.

Next up was the subway tile. We purchase our tile from a local tile company called Floor & Decor  . They had the absolute best prices on tile! The tile was 15 cents each!!

7F55E68B-2797-4925-B1F4-1CC038AD2429

The tile went pretty quickly in comparison to the countertops! Next up was the grout! We decided to Pearl Gray for the grout color.

DD9651F6-8D39-4144-A37A-2FBE5FF348E3

The grout and mortar were also purchased from Floor & Decor.

Last but certainly not least was the painting of the kitchen cabinets. This is the 3rd time our cabinets have been painted. I used Ibis White from Sherwin Williams, previously. The interior of our cabinets had never been painted and I had dreams of painting the inside of the cabinets white. I decided to go ahead and tackle the painting of the inside and outside of the cabinets! I decided to use my DIY chalk paint recipe and use the same color Ibis White. I chose chalk paint because of its hardiness and durability!

0A27524D-F21A-4B30-98A0-FE5553B8DF65

I am am not going to lie, it was a ton of work and I could not have done it without my two oldest daughters helping me! It took us about 10 days to do it all but I still think it was so worth it! The painted 3 coats on the inside of all the oak cabinets and drawers, since they had never been painted before! In between each coat, I did a light sanding, by hand, so that it would cut down on brush strokes. After each sanding, you will needed to wipe out all the soot with a dampened cloth. Everything that we sanded was by hand only.

8C086D19-DED6-4EE2-B7DA-C7BE515A42C9

I also lightly distressed all of my cabinets on the inside and outside. When I distress, I like to distress where the item would naturally receive wear.

I also decided to replace the drawer pulls with brushed nickel pulls that I found on Amazon for cheap!

9FDB6768-76E9-4741-B4A0-0C39717088B8

Ok, so I know y’all are wondering what the total cost was on our budget friendly renovation?

Here is a break down of costs:

-Drawer Pulls-$18

-Ardex-$60 (I used 2.5 bags @ $30 each. One bag was leftover from our upstairs bathroom.)

-Tile, Mortar & Grout-$90 (15 cents per tile)

-Paint, Baking Soda-$162 (Sherwin Williams paint plus 12 boxes of baking soda to make chalk paint.)

-White Farmhouse Sink-$399

Total Cost-$730

We are enjoying our kitchen and all of our hard work! You can find many of our projects saved under “highlights” on my IG page or our You Tube account. Follow along with me on IG in stories everyday, as I usually always have some sort of diy going on!

❤️-Shae

Kitchen Essentials with Rod Works

Kitchen Essentials with Rod Works

Hey friends! I always like to have total transparency! This blog post includes an affiliate link and we collaborated with Rod Works on both of these canister sets. My opinions are always my own and I would never share anything with y’all that I don’t truly love. Thank you for your support friends!

Hey y’all!! My name is Shae. My husband and I like to say we are a powerhouse when it comes to our DIY’S for our home and in between raising our four daughters, being an Instagram Influencer, I brought in my blog this past January! We share anything from home décor styling, DIY budget friendly renovations, recipes, and more!

Have you wanted to update your kitchen on a budget with products that don’t break the bank? The hubs and I recently updated our kitchen with concrete countertops, a white subway back splash, a white farmhouse sink and white chalk painted cabinets.

83DF0688-0CFD-4950-9842-09C69C7996B6

After the renovations were completed, (it took about 3 weeks) I began searching for décor to complete our kitchen renovation. I knew I wanted a whites and woods type of pallet. My husband made the wood cutting boards that you can find in this post from a large 75 year old tree that had fallen onto our property. I found various baskets from thrift shops and a few that I had in my décor closet. I also added touches of greenery and a couple signs that we had previously made. I felt like this one counter space was missing something and couldn’t quite place my finger on it. When I found these canister sets from Rod Works , I knew it was the perfect kitchen essential for my countertop! The Coffee/Tea canister set can be found here and the Flour/Sugar canister set can be found here .

00FFA39F-CB9B-4470-985A-5EACD02C4D0C

The canisters are ceramic with a slight gloss finish and a seal to insure freshness! I have had them in my kitchen for the past couple of weeks now and I love how all of the items I use on a daily basis are right at my fingertips! They are practical, convenient, free up space in your pantry and are budget friendly! Please check out my friends over at Rod Works for all of your home décor needs!

Thank you for stopping by today!

❤️-Shae

Handmade with Love

Today I am teaming up with six of my blogging pals for a blog hop! We were challenged to find something from a Thrift Store, Estate Sale, Yard Sale, Family Heirloom, ect. I had the idea to ask the hubs if he would be willing to make me a few wood cutting boards and a riser for our newly renovated kitchen! Let me tell you how it all began! Last December, we had a large tree fall on our property.

9EA4446B-1A69-4EE1-A656-77711DC16180

We took our youngest two girls to the top of the hill, where it had fallen, and counted all the rings in the tree to find out how old it was- It was 77 years old!

C407853C-1207-4368-A112-3EC91893C1A7

My husband had the idea to mill the wood, so that we could have this beautiful tree as lumber!

86ADEE30-DBD3-4045-87E7-32AE0922FC41

As soon as our blog hop came about, I knew I wanted to see if he would make those wood cutting boards and a riser for our kitchen!

5D7A0646-1AF8-49BD-B675-FCE993D00EBD

My husband was able to mill several beautiful pieces of this red oak tree. I just love an item that is sort of repurposed in its own way. From this 77 year old red oak tree, we were able to get a couple years worth of firewood and many beautiful furniture pieces to come! The picture below is my husband doing what he does best! Making something beautiful for his wife 😉

30AF16E1-9B37-4C7C-B0ED-E7EA58C8D4EC

He definitely makes my heart skip a beat to see him making something for our home. We did not spend any money to make the riser or the wood cutting boards. It was just our time.

153A794D-F5DA-42AA-8BED-12D174EFAD4A

I also used olive oil to condition the wood and added twine to the cutting boards.

D482F0AB-FD18-4C72-B121-960B963514B1

Please check out all of my buddies to see their finds for this month! Never a disappointment for sure! Love, love, love working with all of these wonderfully, talented friends of mine!

❤️~Shae

Vintage Brass Candlesticks – August Thrift Store Challenge

B0AE0959-0E63-4BEE-A083-E23699FA6F65

Thrift Store Challenge – August 2019

9CFB0B1E-A50E-496E-A13F-2D7E52B668F3

DIY PUMPKIN FRAMED ART

0CEC6DF9-87C3-4E6A-A225-FC9B90E0925F

Thrift Store Challenge: Drab To Fab Side Table

8EB2379A-EFF0-490C-BEA0-4B7399482AC1

Corbel Update

34333F07-6098-4D29-8F6E-E8C551EB5A3F

Thrifted Treasure ~ August

08D46BD3-E6F8-4B51-A715-17DE5BC5A216